20 Minute Meals with Trader Joe's: Mediterranean Quinoa Salad
Photo by Amy Angelo

Photo by Amy Angelo

This dish is bursting with flavor and a perfect way to clean out the pantry. Enjoy it warm or chilled – making it amazing for meal prep. Simply cook quinoa, make a quick olive oil shallot garlic dressing, and top with all the best Mediterranean flavors. This meal comes together so quickly and is so satisfying. Feel free to stuff into a roasted sweet potato or bell pepper, top over salad greens, or enjoy as the perfect side dish to your meal.

As an added bonus all the items for this dish can be found at Trader Joe’s and comes together in less than 20 minutes hands on time – score!


Mediterranean Quinoa Salad

Yield: 4 Servings

  •       1 cup quinoa, thoroughly rinsed

  •       2 tablespoons olive oil

  •       2 shallots, small dice

  •       2 cloves garlic, finely minced

  •       Juice of 1 small lemon

  •       1 cup jarred marinated artichoke hearts, loosely chopped

  •       20 green olives, pitted + loosely chopped (I like the Trader Joe’s packets)

  •       ½ cup oil packed sun-dried tomatoes

  •        10 basil leaves, finely chiffonade, or more to taste

  •        ½ cup nuts or seeds of choice

  •        1 teaspoon salt, or to taste

  1. Cook quinoa according to package directions Set aside.

  2. Heat a small sauté pan over medium low heat, once hot add all olive oil (2 tablespoons), once oil is hot add shallots and garlic, sauté until fragrant, 2-3 minutes.

  3. Place cooked quinoa in a large bowl, drizzle olive oil shallot mixture and lemon juice. Stir to incorporate. Mix in remaining ingredients, season to taste.

Photo by Amy Angelo

Photo by Amy Angelo

Katie FarinaComment
Detoxing Sage Squash Bisque
Photo by Amy Angelo

Photo by Amy Angelo

This is a super easy + delicious soup, perfect for cozy evenings, or a quick lunch. It packs 4 different fruits and vegetables into one convenient crave-worthy meal. Simply saute a few veggies with garlic and sage, add butternut squash (which can even be frozen), simmer in vegetable stock, blend and salt to taste. For a creamier richer soup drizzle in coconut milk, and top with toasted pumpkin seeds and fresh sage.

Butternut squash is the lowest calorie + highest fiber of the squash family, making it an amazing cleansing food. Combine that with green apple, another detox super-food and you’ve got a perfect meal to help you feel your best.

Enjoy and stay healthy!


Detoxing Sage Squash Bisque

Yield: 8 Servings

  • 20 sage leaves, divided

  • 1 tablespoon olive oil

  • 1 medium yellow onion, small dice

  • 2 cloves garlic, finely minced

  • 2 medium green apples, skin on, small dice

  • 4 cups butternut squash chunks, can be frozen

  • 4 cups vegetable broth

  • 1-2 teaspoons salt

  • Optional Garnishes: Canned coconut milk, toasted pumpkin seeds, chopped herbs of choice

  1. Chop 10 sage leaves into fine ribbons.

  2. Heat a medium pot over low heat. Once hot, add olive oil. Once oil is hot add onion, garlic, and 10 chopped sage leaves. Saute until translucent and starting to caramelize — about 20 minutes, stirring frequently.

  3. Add green apples, butternut squash, and vegetable broth to pot. Bring to a simmer, once simmering, cover soup and let gently simmer for 20 minutes, or until squash is soft.

  4. Add soup and remaining sage leaves to a blender, blend soup (doing it in 2 batches if necessary) until COMPLETELY liquidy smooth. Salt to taste, start with 1 teaspoon and go from there.

  5. Garnish with a swirl of coconut milk and desired toppings.

  1. Depending on how long and hard the soup cooks some of the liquid can be evaporated creating a thicker consistency. If the soup seems too thick add water to thin out to desired consistency.

  2. Feel free to replace the butternut squash with any squash or even orange sweet potatoes.

Photo by Amy Angelo

Photo by Amy Angelo

Katie FarinaComment
Clean Eating Spaghetti Squash Casserole
Photo by Amy Angelo

Photo by Amy Angelo

The perfect casserole for cozy weather. The whole dish is made from vegetables, and makes an amazing main dish. It’s got the same comforting delicious flavors of lasagna with out all the guilt and all the work. Did I mention this casserole comes together so easily?!?! Simply roast a spaghetti squash, saute kale, and combine with sun-dried tomatoes, nutritional yeast, and a touch of salt then simply bake. It gets even better after a few days, making it an amazing meal prep dish.


Katie’s Spaghetti Squash Bake

Yield: 5 servings

  • 1 small spaghetti squash

  • Olive oil

  • 6 cloves garlic, minced

  • Pinch chili flakes

  • 1 bunch curly leaf kale, cleaned + de-­stemmed + shredded

  • Juice of 1/2 lemon, or more to taste

  • 1/2 cup sun-­dried tomatoes packed in oil (Costco brand recommended)

  • 1/2 cup nutritional yeast

  • 1 cup jarred marinated artichoke hearts, loosely chopped

  • Salt to taste, about 1 - 2 teaspoons

  1. Bake spaghetti squash by pre-heating oven to 375. Slice off ends of squash and cut into 3 or 4 circular chunks. Remove seeds. Place on a parchment lined baking sheet. Drizzle with oil and salt. Bake for 40 to 60 minutes or until squash is lightly golden, turning periodically. Let cool slightly. Use a fork to tear away at noodles.

  2. Sauté kale by heating a large non-­stick pan over medium-­low heat. Once hot, cover the pan completely with olive oil. Once oil is hot, add minced garlic and chili flakes. Sauté until fragrant, about 2 to 3 minutes. Add kale and sauté until wilted, adding kale in batches if needed as to not overwhelm the pan. Season with lemon juice and salt.

  3. In a casserole or brownie dish, combine spaghetti squash noodles, sautéed kale, sun-­dried tomatoes, nutritional yeast, and artichoke hearts. Salt to taste.

  4. Bake casserole at 375 uncovered for 20 minutes. Enjoy warm.

Photo by Amy Angelo

Photo by Amy Angelo

Katie FarinaComment
BBQ Jackfruit Sliders with Herbed Yogurt Ranch
Photo by Amy Angelo

Photo by Amy Angelo

These little sliders are perfect for parties, sports game-watching, and of course just a delicious + healthy dinner. This recipe comes together so EASILY! Simply pulse the jackfruit in your food processor or loosely chop up and simmer with your favorite BBQ sauce. While that’s cooking whip up the easiest most delicious ranch that you’ll want to put on everything. We’re lightening up a traditional ranch by using half plant based yogurt. Then adding garlic, green onions, lemon juice, and dill for the perfect crave worthy sauce. Trust me, this sauce can liven up any dish. We’re using slider buns to make little sandwiches but this is also amazing stuffed into a baked sweet potato or over chips. 

Happy cooking my friends! 


BBQ Jackfruit Sliders

Yield: 8 Sliders

Ingredients:

  • 1 (20 ounce) can jackfruit in brine, drained + rinsed (available at Trader Joe’s)

  • Your favorite BBQ sauce

  • 1 bag shredded cabbage

  • Herbed Yogurt Ranch Dressing (see recipe below)

  • Gluten-free slider buns (I like “Little Northern Bakehouse”) 

Directions: 

  1. Pulse jackfruit in a food processor until crumbly consistency, about 30 seconds. Or loosely chop into bite size pieces.

  2. Add jackfruit to a small pot and add desired amount of BBQ sauce, simmer for 20 minutes on low, stirring occasionally.

  3. Toss cabbage with desired amount of Herbed Yogurt Ranch.

  4. Gently toast buns, top with BBQ jackfruit and ranch slaw. Enjoy immediately.

Herbed Yogurt Ranch Dressing

  • 1/4 cup vegan mayo of choice 

  • 1/4 cup vegan plain unsweetened yogurt of choice (I like “Kite Hill”)

  • 2 small garlic cloves, minced

  • 2 green onions, finely minced

  • small handful of dill, finely chopped 

  •  juice of 1/2 lemon, or more to taste 

  •  salt to taste

Directions: Whisk together all ingredients, salt to taste.

Photo by Amy Angelo Photography

Photo by Amy Angelo Photography

Katie FarinaComment
Probiotic Rich Cherry Smoothie
Photo by Amy Angelo

Photo by Amy Angelo

This smoothie is a cherry + yogurt lovers dream come true! It’s packed with gut healthy probiotics from the yogurt and antioxidants from the cherries. The lime juice adds a great zing but also brings out the sweetness of the cherries and of course is loaded with vitamin c. The perfect smoothie to make for your Valentine or any day!


Probiotic Rich Cherry Smoothie

Yield: 1 Serving

Ingredients:

  • 1 1/2 cups frozen cherries

  • 1 banana, cut into chunks + frozen

  • 1/2 cup non-dairy unsweetened yogurt of choice, I like Cocoyo

  • 1/2 - 3/4 cup non-dairy unsweetened milk of choice (such as almond, coconut, or cashew)

  • Juice of 1 lime

Directions: Combine all ingredients together in a high speed blender, adding a splash more milk if desired.

Photo by Amy Angelo

Photo by Amy Angelo

Katie FarinaComment
Clean Eating "Snickers" Truffles
SnickersTruffles_KHK_AAP_55_2.jpg

Stop what you’re doing immediately and go make these truffles — you won’t be sorry! I created this recipe a few months ago and I think it might just be my clients favorite dessert I’ve ever made — not to mention my husbands too.

We’re recreating a traditional candy bar in a much healthier way. The base for the truffle is salted peanuts, dates, and a bit of coconut sugar. Pulse that together with peanut butter, coconut, oil, and maple syrup and magic happens: it turns into a beautiful formable dough. Roll that into truffles and optionally dip into melted chocolate and voila you have something that tastes just like a candy bar but much healthier. Make up a batch to give away to co-workers, friends, your significant other, or just to enjoy yourself! They store beautifully in the freezer for up to 2 months but have the best texture out of the refrigerator where they’ll last about 10 days tightly sealed.


“Snickers” Truffle

Yield: 30 Truffles 

Ingredients:

  • 1  1/2 cups salted peanuts

  • 1  1/2 cups medjool dates, pitted

  • 1/4 cup raw cacao powder

  • 1/4 cup chocolate chips

  • 1/4 cup + 2 tablespoons coconut sugar

  • 1/4 cup peanut butter

  • 1/2-3/4 teaspoon salt

  • 3 tablespoons coconut oil, room temp or melted

  • 1 tablespoon maple syrup, optional

  • Optional Chocolate glaze: 2 cups chocolate chips

Directions:

  1. Combine all ingredients (except optional chocolate glaze chocolate chips) in a large food processor until smooth, stopping the food processor to scrape the mixture. Once formed into a dough, taste for sweetness adding more sweetener if desired.

  2. Roll into truffle size balls using a cookie dough scoop or a tablespoon measurer. Place truffles on a parchment or wax paper lined baking sheet.

  3. Place in the refrigerator.

  4. Meanwhile create a double boiler. Add remaining 2 cups chocolate chips to heat safe bowl over simmering water. Let gently melt. Once completely melted and liquidy remove from the heat.

  5. Place each truffle on a fork and dip into chocolate mixture and gently tap to remove any excess chocolate. Place back on baking sheet and sprinkle with a pinch of salt. Complete with remaining truffles. Place finished truffles in the fridge for at least an hour to set up. Cover and store in the refrigerator until ready to enjoy. 

Photos By Amy Angelo

SnickersTruffles_KHK_AAP_39.jpg
Katie FarinaComment
Clean Eating Turmeric Smoothie
TurmericSmoothie_KHK_AAP_28.jpg

Switch up your smoothie game! I love this for breakfast, but it’s also great as a guilt-free sweet treat! If you love golden milk then this is the smoothie for you. 

The base for the smoothie is coconut milk, but feel free to use any non-dairy milk of your choosing. For an extra creamy milkshake replace 1/4 of the milk with canned coconut milk. Then it’s blended with dates, frozen banana, spices, a touch of maple syrup (if desired), and ice. 

Even though this tastes like an indulgent milkshake it’s packed with nutrients. The turmeric powder is a powerful antioxidant, full of anti-inflammatory properties, and incredible anti-cancer properties. Cinnamon is no slacker either, the delicious spice ranks in the top 10 highest antioxidants food according to the ORAC score. Enjoy!


Clean Eating Turmeric Smoothie

Yield: 3 cups

  • 1 cup unsweetened cartoned coconut milk 

  • 2 medjool dates, pitted

  • 1 frozen banana, cut into chunks

  • 1 teaspoon turmeric powder

  • 1/2 teaspoon cinnamon powder

  • 1/4 teaspoon ginger powder

  • Pinch black pepper

  • 1 teaspoon (or more to taste) maple syrup

  • Ice, optional if desired

  1. Blend everything until smooth, adding ice if desired. 

TurmericSmoothie_KHK_AAP_16.jpg
Katie FarinaComment
Veggie Loaded White Wine Garlic Pasta
VeggiePasta_KHK_AAP_16.jpg


This is hands down my favorite pasta dish ever! Every time I make it for dinner my husband and I sit in silence, too busy eating to talk, which is very uncommon for us. It’s my kind of comfort food. Luckily for me it packs 3 different vegetables so I can feel good about indulging! 

This dish comes together in under 30 minutes and can be easily meal prepped for the week. Start off by sautéing lots of garlic in olive oil in your largest sauté pan (it’s important to have a large pan because eventually you’ll be adding the pasta directly to the pan), then adding white wine and cherry tomatoes and letting them melt into the sauce. Finish off with spinach and broccoli. The secret to thickening the sauce for this recipe is actually using a bit of the starchy water from cooking the pasta. The leftover starch in the water will thicken the sauce and also make the sauce adhere to the pasta. 

I hope you enjoy this recipe as much as we do. 


Yield: 3 Servings

Veggie Loaded White Wine Garlic Pasta

  • 1/4 cup extra virgin olive oil, measure this out - it’s important for when the pasta is added to the dish

  • big pinch of chili flakes

  • 5 garlic cloves, minced

  • 1/4 cup white wine

  • 1 pint cherry tomatoes, halved

  • 3/4 pound pasta of choice (I like Jovial)

  • 2 cups broccoli florets

  • 3 cups baby spinach 

  • 1/2 cup pasta water

  • 1/2 cup vegan parmesan (I like “Follow Your Heart”)

  • Zest of 1 lemon

  • 1 tablespoon lemon juice

  • 1 teaspoon salt, or more to taste 

  1. In a large sauté pan over medium low heat add olive oil. Once oil is hot, add chili flakes and garlic. Sauté until fragrant, 1-2 minutes. Add white wine, let simmer for 1-2 minutes.

  2. Add cherry tomatoes to sauce and let simmer until tomatoes break down and start to burst, about 15 minutes.

  3. Meanwhile cook pasta until al dente, in the last minute of pasta cooking add broccoli, then drain, reserving 1/2 cup of the pasta water. Add cooked pasta and broccoli to simmering sauce. 

  4. Add spinach, reserved pasta water, parmesan cheese, lemon zest, and lemon juice. Sauté until combined, salt to taste. 

VeggiePasta_KHK_AAP_27.jpg
Katie FarinaComment
Roasted Vegetable Wild Rice Salad
WildRiceSalad_KHK_AAP_23.jpg

I know what you’re thinking a boring rice salad! Well this is so far from that and might even become your new favorite side dish. This dish packs so much flavor. It’s perfect warm, room temp, or chilled. I love stuffing it into squashes or over a pile of greens but it’s so wonderful as is too.

We start with wild rice, which is technically not a grain but a grass. Really nice and hearty starch that’s loaded with vitamins . We toss it in a beautiful orange shallot dressing and fold in tons of roasted vegetables (use whatever you have), dried cranberries, nuts of choice, and green onions. This dish is so packed with flavor and is a great way to use up vegetables that are hiding in the back of you fridge.


Yield: 6 Servings

Roasted Vegetable Wild Rice Salad

Rice: 

  • 1 cup wild rice

  • 4 cups roasted vegetables of choice, I like butternut squash, brussels sprouts, bell peppers and sweet potato, small dice

  • 1/2 cup dried cranberries

  • 1/2 cup nuts of choice, lightly toasted (walnuts, pecans, almonds etc..)

  • 6 green onions (white and green parts), thinly sliced

Dressing:

  • 1/4 cup olive oil

  • 2 large shallots, small dice

  • 2 garlic cloves, finely minced

  • 1 teaspoon orange zest

  • 1/4 cup freshly squeezed orange juice

  • 1 tablespoon maple syrup

  • 1 teaspoon dijon mustard

  • 1/2 teaspoon salt

  1. Cook wild rice according to package directions.

  2. Meanwhile prepare dressing; Gently heat olive oil in a sauté pan, once hot add shallots and garlic. Sauté until fragrant, 2-3 minutes. Pour shallots garlic oil into a bowl, whisk in remaining dressing ingredients.

  3. Toss cooked wild rice with vegetables, cranberries, nuts, and green onions. Toss with dressing. Season to taste. 

WildRiceSalad_KHK_AAP_9.jpg
Katie FarinaComment
Perfect Hot Cocoa
_MG_2059.jpg

Check out the perfect hot cocoa to snuggle up with this holiday! It comes together in just a few minutes and is much easier and healthier than traditional store bought hot cocoa mix. Start off with your favorite non-dairy unsweetened milk, a little raw cacao powder (brimming with antioxidants + plant based iron), low glycemic coconut sugar, your favorite chocolate chips, and a little peppermint extract for a special holiday twist.

Wishing you all a cozy and wonderful holiday!!!


Yield: 1 Serving

Perfect Hot Cocoa

• 1 cup non-dairy unsweetened milk of choice
• 1 tablespoon raw cacao powder
• 2 tablespoons coconut sugar
• 1 tablespoon chocolate chips
• 1/8 teaspoon peppermint extract, or more to taste
• Optional garnishes: marshmallows, whipped cream, candy canes, crushed candy, chocolate shavings, etc . . .

Combine all ingredients in a small saucepan over medium heat. Whisk until combined and hot. Top with optional garnishes.

_MG_2078.jpg
Katie FarinaComment
Grain Free Gingerbread Granola
_MG_1972.jpg

Looking for the perfect holiday DIY gift?!?! Well look no further! This granola has all the delicious holiday flavors, with out the sugar, and as an added bonus comes together in minutes. It’s perfect to wrap up in a cute tin as a gift or to make for Christmas morning. I love to serve it with coconut milk and tons of banana slices.

This granola is amazing because you can really use whatever nuts or seeds you have on hand. I personally love using sunflower seeds and pecans, but the combinations are endless. The spices and molasses really take on that true gingerbread flavor, but if you don’t have molasses it’s still delicious and festive.

It’s taken me years to perfect this granola recipe and I hope you love it as much as I do!


Yield: 3 cups

Gingerbread Granola

• 1 cup chopped nuts (walnuts, cashews, almonds)
• 1 cup seeds (pumpkin, sunflower, hemp)
• 1 cup shredded unsweetened coconut
• 2 tablespoons coconut oil, melted
• 1/3 cup maple syrup
• 1 tablespoon molasses
• 2 teaspoons cinnamon powder
• 1 teaspoon ginger powder
• 1/2 teaspoon salt or more to taste

1. Pre-heat oven to 350. Line a baking sheet with parchment paper.
2. In a large bowl, mix all ingredients until combined.
3. Line granola mix evenly on baking sheet. Bake for 20 to 23 minutes or until golden, being sure to stir every 5 minutes to prevent burning.
* If you double this recipe the cooking time with increase by 5-10 minutes.

Place in mason jars, jars, or decorative bags. Write recipe on a index card and attach. 

_MG_1950.jpg
Katie FarinaComment
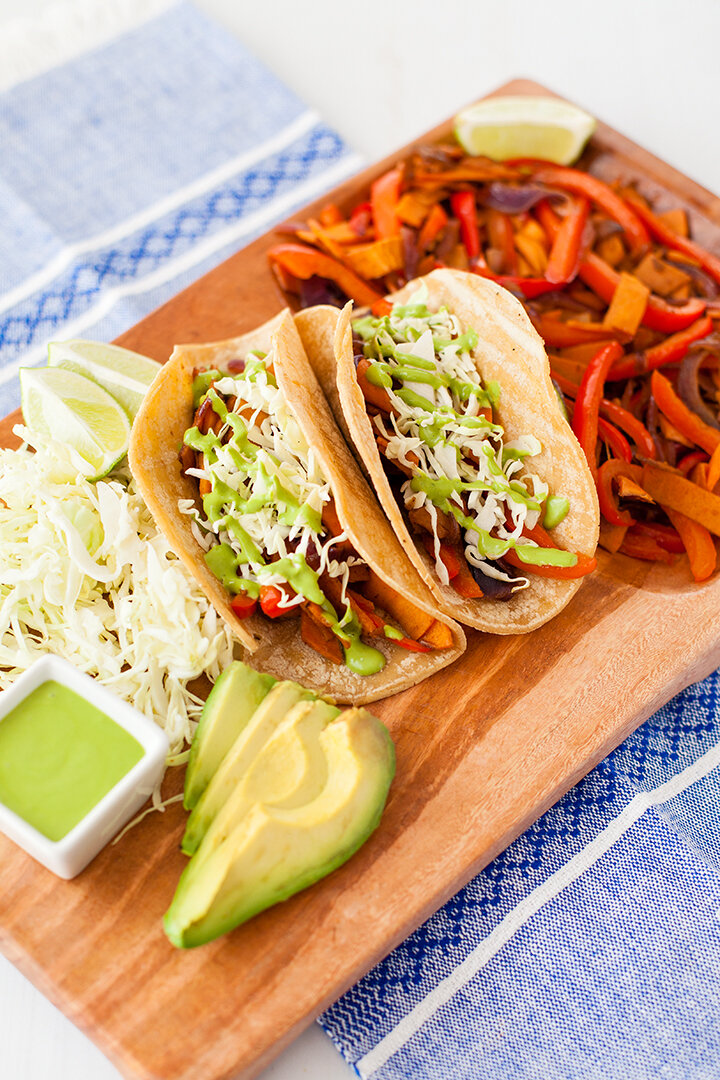
20 Minute Meals with Trader Joes: Sweet Potato Fajitas with Cilantro Crema
Sweet Potato Fajitas

This dinner comes together quicker than take-out can be delivered! As an added bonus almost all the ingredients can be found at Trader Joe’s!

The sweet potato ribbons (found in the refrigerated produce section of Trader Joe’s) are my go-to quick dinner secret. They can be easily stir fried with other vegetables for a taco or for over rice and teriyaki sauce. The thinness of them makes them perfect for a quick stir fry but they are also great steamed or baked. I often add a handful in the last few minutes of pasta or rice cooking for an extra boost of nutrition.

The cilantro crema is not to be missed! Cilantro is great for detoxing and adds so much flavor to dishes with out the need of excess salt. When making the crema don’t worry about picking the leaves, simply cut the bunch right before the twist tie, (leaving the bottom part of the bunch for compost or making vegetable broth) and add the leaves and stems directly to the blender. Cilantro stems taste like cilantro so in a blended sauce like this it’s not necessary to pick around the leaves.


Yield: 4 Servings

Sweet Potato Fajitas

•   avocado oil (Chosen Foods)
•   1 red onion, cut into half moons
•   2 garlic cloves, minced
•   2 red bell peppers, cut into thin strips
•   1 (12 ounce) box sweet potato ribbons, found at Trader Joe’s in the refrigerated produce section
•   1 tablespoon chili powder (Simply Organic)
•   Juice of 1-2 limes
•   Salt to taste
•   For serving: Cilantro Crema (see below), tortillas, shredded cabbage, lime wedges

1.  Heat a large non-stick sauté pan over medium heat. Once pan is hot, cover with avocado oil. Once oil is hot add onion, garlic, and bell peppers. Sauté until onion is translucent, about 10 minutes.
2.  Add sweet potato ribbons, chili powder, and lime juice to skillet. Cook until sweet potatoes are tender, about 20 minutes. Salt to taste. Serve with desired toppings.


Cilantro Crema

•   2 big bunches of cilantro
•   1 cup vegan mayo (I like Sir Kensington Aquafaba Mayo)
•   2 garlic cloves
•   juice of 1 lime
•   water as needed to reach desired consistency, about 1 tablespoon
•   salt to taste

1.    Chop the bunches of cilantro right before the twist tie, add to blender.

2.    Add remaining ingredients to a blender, blend until smooth, adding water until desired consistency is reached. Salt to taste.

Sweet Potato Fajitas
 
Katie FarinaComment
Pumpkin Pie Chia Pudding Parfait

All the delicious pumpkin pie flavors with out all the work! What I love about chia pudding is you can really make it into any kind of flavor you want . . . think cookies n’ cream, strawberry shortcake, or simple vanilla, the possibilities are endless!

This chia pudding comes together in minutes and is loaded with a heavy dose of vitamin A thanks to the pumpkin. The chia seeds are a true superfood, loaded with protein, calcium, and fiber. This makes for a special dessert but also a wonderful breakfast or sweet snack.

Just as a reminder when making chia pudding you want to whisk the chia seeds in the milk mixture -- not blend, or else it will turn into a really thick smoothie as opposed to a chunky pudding. It’s also super important to use a coconut milk with thickeners, such as Thai Kitchen or Whole Foods or Sprouts brand coconut milk.


Yield: 4 Servings

Pumpkin Pie Chia Pudding Parfait

•   1 1/2 cups non-dairy unsweetened milk (almond, coconut, cashew, etc . . . )
•   1 (15 ounce) can coconut milk ( I like “Thai Kitchen Organic” from Costco)
•   1/2 cup pure maple syrup
•   1 teaspoon cinnamon (Simply Organic)
•   1/2 teaspoon pumpkin pie spice (Simply Organic)
•   1/4 teaspoon ground ginger (Simply Organic)
•   3/4 cup canned pumpkin (not pumpkin pie filling)
•   1/2 cup chia seeds (Navitas Naturals)

1.  Blend together non-dairy milk, coconut milk, maple syrup, spices, and canned pumpkin until smooth.
2.  Pour mixture into a large bowl. Thoroughly whisk in chia seeds. Place in the refrigerator, covered, for 2 hours or more. Whisk again before serving.

Pumpkin Pie Chia Pudding Parfait
 
Katie FarinaComment
Fall Roasted Vegetable Mac N’ Cheese Pasta
Mac N’ Cheese Pasta

It’s finally starting to feel a bit more like fall here in San Diego. Which to me means comfy sweaters, cozy nights in, and lots of creamy pasta dishes. This is different than normal creamy pasta dishes as it gets it’s creaminess from vegetables! The cream sauce is made by blending steamed vegetables with non-dairy milk, seasonings, and of course nutritional yeast . . . a must for vegan mac n’ cheese. The sauce is super low in calories, while still being high in fiber, and bursting with nutrients and flavor. As an added bonus the sauce takes just minutes of hands on time to prepare, even less if you use frozen cauliflower florets!

The addition of roasted vegetables and tempeh bacon crumbles makes it a complete meal. This recipes meal preps beautifully too, just keep the sauce separate from the pasta as once combined it tends to congeal. So go ahead and conquer your creamy pasta cravings in a healthy way.


Yield: 4 big servings

Fall Roasted Vegetable Mac N’ Cheese Pasta

•   1 2 ounces pasta shapes of choice (I like Jovial bowties)
•   2 heaping cups cauliflower florets (can be frozen)
•   1/2 cup russet or gold potato, cut into medium chunks
•   1 cup unsweetened + unflavored non-dairy milk of choice (I like carton coconut or almond)
•   1 tablespoon fresh lemon juice
•   1/3 cup nutritional yeast
•   1 clove garlic
•   1 teaspoon salt, plus more to taste
•   1 teaspoon garlic powder
•   Roasted vegetables, optional, see Chef’s Tips
•   Tempeh bacon, crumbled, optional (see blog recipe: Loaded Tempeh Bacon Sandwich )

1.  Cook pasta according to package directions. Set aside.
2.  Meanwhile steam or boil cauliflower and potato together until completely soft and broken down, about 15-20 minutes.
3.  Combine cooked vegetables with non-dairy milk, lemon juice, nutritional yeast, garlic, salt, and garlic powder in a blender. Blend until completely smooth.
4.  Toss sauce with pasta and salt to taste. Garnish with roasted vegetables and tempeh bacon crumbles if desired.

Chef’s Tip: To roast vegetables pre-heat oven to 425. Line a baking sheet with parchment paper. Toss desired vegetables (cauliflower, squash, red onion, zucchini, and Brussels Spouts are all great for this) in enough high heat oil to coat and a few pinches of salt. Place on prepared baking sheet and roast for 35-50 minutes, stirring every 10 minutes to prevent burning.

Mac N’ Cheese Pasta
Mac N’ Cheese Pasta
Mac N’ Cheese Pasta
Mac N’ Cheese Pasta
Katie FarinaComment
Loaded Tempeh Bacon Sandwich with Roasted Garlic Aioli
Tempeh Bacon Sandwich

My husband’s favorite sandwich before going vegan was a BLT. I wanted to try and recreate his beloved sandwich in a healthy way that would still conquer the craving.  The sandwich starts off with homemade tempeh bacon. It really is so simple to make your own tempeh vegan. After steaming just let the strips marinade and then simply fry in hot oil in a non-stick skillet or cast-iron pan to get the nicest sear. That combined with veggies and the roasted garlic aioli and you’ll be drooling for more.

Roasted garlic is the secret to this delicious aioli. It’s simple to roast garlic, see the Chef’s Tips below. Just remember to let it cool completely and then as my papa says squeeze out the cloves like you would that last bit of toothpaste. This aioli doubles as a great dipping sauce for fries or vegetables.


Yield: 4 Sandwiches

Loaded Tempeh Bacon Sandwich with Roasted Garlic Aioli

•   your favorite bread (I like sourdough)
•   Tempeh Bacon (see recipe below)
•   Roasted Garlic Aioli (see recipe below)
•   2 tomatoes, cut into slices
•   lettuce, torn into large pieces
•   1 medium ripe avocado, sliced
•   handful broccoli sprouts, optional

1.  Lightly toast bread, smear generously with aioli on both slices of bread.
2.  Top one piece of bread with tempeh bacon and remaining toppings finish with remaining slice of bread and enjoy.


Tempeh Bacon

•   1 package of gluten-free tempeh, cut into 4 sections (Lightlife)
•   1/4 cup low sodium tamari
•   2 tablespoons maple syrup
•   1/2 teaspoon onion powder
•   1/2 teaspoon garlic powder
•   Few drops liquid smoke, optional but recommended (tag liquid smoke)
•   High heat oil (avocado, refined coconut, or grapseed)

1. Steam tempeh in a steamer basket or boil for 10 minutes.
2. Cut tempeh into thin strips.
3. Combine tamari, maple syrup, onion powder, and garlic powder in a shallow dish. Place tempeh in marinade. Let sit in the refrigerate for an hour (or more) to marinate.
4. Heat up a non-stick skillet or cast-iron pan, cover the bottom of the pan with oil, once oil is hot add tempeh slices (in 2 batches), fry on each side for 3-4 minutes or until crispy. Place on a paper towel lined plate to cool.


Roasted Garlic Aioli

•   1/2 cup vegan mayo (I like Sir Kensington Aquafaba Mayo)
•   8 cloves roasted garlic, finely chopped, see below
•   1 clove fresh garlic, finely minced
•   1 green onion, green + white parts, finely minced
•   Juice of half a lemon
•   Salt to taste

Whisk together all ingredients. Salt to taste.  

How to Make Roasted Garlic:
1.  Preheat oven to 350°F.
2.  Line a piece of foil with a small piece of parchment paper. Take a whole garlic bulb and cut a half inch or so off the top so the garlic cloves are visible. Add bulb to prepared foil, drizzle with olive oil and a few pinches of sea salt. Tightly seal up the foil so no oil can escape, and the garlic is totally covered.
3.  Place packet in oven directly on rack and bake for 30 minutes. Remove from oven and open foil packet. Let cloves cool.
4.  Once cool, squeeze out garlic from skins.

Tempeh Bacon Sandwich
 
Katie FarinaComment
Dreamy Minty Green Smoothie

This smoothie is my favorite way to start the morning. I also love it as a healthy alternative to a sweet treat. The combination of mint and dates makes for a dreamy pair similar to a popular minty milkshake. Feel free to add in a square of dark chocolate to the smoothie and top with whipped cream for an extra special treat.

This smoothie is also loaded with lesser known superfoods (hello mint and spirulina!) Fresh mint not also soothes a upset stomach, freshens breath, it’s herbaceous fresh smell and taste can even help combat anxiety and stress.

Where do I even being with spirulina? If you’re not familiar with this green superfood powder, it’s actually a blue green algae, sounds appealing, huh? It does have a strong flavor, but start with small amounts and gradually try to build up to 1 teaspoon a day for the most amazing health benefits. Spirulina is extremely high in easily absorbable protein, plant based iron and calcium, and can even help remove heavy metals from the body.


Yield: 1 serving

Dreamy Minty Green Smoothie

•   1 cup non-dairy unsweetened milk, such as almond, coconut, or cashew
•   2 cups crushed or cubed ice
•   6 medium medjool dates, pitted
•   1/2 cup fresh mint, packed
•   1 cup fresh baby spinach, packed
•   1/4 teaspoon spirulina (Health Force Nutritionals)

1.  Combine all ingredients in a high-speed blender and blend until completely smooth.
2.  Taste for sweetness, adding another date if desired.

Dreamy Minty Green Smoothie
 
Katie FarinaComment
Pumpkin Chia Waffles with Almond Butter Caramel
Waffles.jpg

I love Fall! I really can’t get enough of it! I want roasted vegetables, soup, and anything with pumpkin! This waffle is the perfect way to get your pumpkin fix in a healthy and delicious way. Be sure to serve the waffles with plenty of almond butter caramel!


YIELD: 3 waffles

Pumpkin Chia Waffles

• 1 1/4 cups canned pumpkin puree
• 1 1/4 cups unsweetened non-dairy milk (coconut, almond, cashew, etc.)
• 1 tablespoon pure vanilla extract
• 1/4 cup coconut oil, melted
• 1 1/2 cups Bob’s Red Mill 1-1 Gluten-Free Baking Flour
• 1 teaspoon baking powder
• 1/2 teaspoon salt
• 1 teaspoon cinnamon
• 1/4 cup coconut sugar
• 2 tablespoons chia seeds

1. Blend pumpkin puree with milk, vanilla and coconut oil until completely smooth.  Set aside.
2. Combine flour, baking powder, salt, cinnamon, and coconut sugar in a large bowl.
3. Slowly pour wet ingredients into the dry ingredients, stirring constantly to prevent lumps.
4. Gently fold chia seeds into the batter and let rest for a few minutes to allow the seeds to absorb into the mix.
5. Pre-heat waffle iron while mix is resting.  When hot, spray or brush waffle iron with coconut oil and pour in about 1 cup of waffle batter.
6. Cook according to waffle maker directions. Repeat with remaining batter.
7. Drizzle with almond butter caramel and any other desired toppings.


Almond Butter Caramel

• 4 Cocomels coconut sugar or pumpkin spice caramels (available at Sprouts, Whole Foods, or online)
• 2 tablespoons almond butter, at room tempertaure
• 2 heaping tablespoons coconut oil, solid or melted
• 2-3 tablespoons maple syrup, based off preference
• 1/4 teaspoon cinnamon, optional
• big pinch of salt

1. Combine all ingredients in a small pot over medium heat.
2. Constantly whisk until melted, 4-6 minutes, add more sweetener if desired.
3. Drizzle warm over waffles or your favorite dessert.

 
Katie FarinaComment
Our Famous Chia Pudding
Chia.jpg

The perfect make ahead breakfast that tastes like dessert! Get creative and add a swirl of nut butter, fruit or even melted chocolate.


Yield: 4 Servings

Vanilla Chia Pudding

• 1 can full fat coconut milk (do not use Trader Joes brand, I like Thai Kitchen)
• 1 cup non-dairy unsweetened milk of choice (coconut, almond, cashew etc...)
• 1/3 cup maple syrup or coconut syrup
• 10 drops liquid stevia (optional)
• 1 teaspoon vanilla powder or vanilla extract
• little less than 1/2 cup chia seeds

1. Whisk together milks, maple syrup, stevia and vanilla powder.
2. Whisk in chia seeds.
3. Let pudding sit in the fridge for a few hours to firm up.
4. Stir again before serving.

 
Katie FarinaComment
Katie's Detox Green Smoothie
Katie's Detox Smoothie.jpg

Been indulging a bit too much? Get back on track with this delicious and easy green smoothie. Packed with fruits and veggies, 4 servings to be exact!


Yield: 1-2 servings

Katie's Detox Green Smoothie

• 2 cups cold water
• 2 green apples, cut into chunks
• 1 small head of romaine, washed and chopped into big pieces
• 1/2 cucumber
• handful of spinach
• juice of 1 lime
• optional add ins: Handful frozen broccoli, bunch of mint, 1/2 banana, 1-2 tablespoons aloe vera juice, or any other fruit and or veggie

1. Blend all ingredients together until smooth.

 
Katie FarinaComment
Roasted Turmeric Cauliflower Pilaf
Turmeric.jpg

This is a perfect colorful recipe that can be used as a main course or a side dish. It's great at room temp, making it a wonderful picnic or potluck item. For a low carb version replace the rice with spiralized zucchini. 


Yield: 3 servings

Roasted Turmeric Cauliflower with Basmati Rice and Cilantro + Mint

• 1 large head of cauliflower (or 2 small ones), cut into bite size florets
• 3 tablespoons refined coconut oil
• 2 teaspoons turmeric
• 1 teaspoon cumin
• 1 1/2 teaspoons salt
• Pinch chili flakes
• 1 bunch cilantro
• 1 bunch mint
• 1/2 cup pomegranate seeds
• 1 cup dry basmati rice, cooked according to package directions
• 1/4 cup pine nuts, toasted

1. Pre-heat oven to 425.
2. Toss cauliflower with oil, turmeric, cumin, salt and chili flakes. Place on a rimmed parchment paper lined baking sheet. *Separate into two baking sheets if need be so the cauliflower isn't clumped together.
3. Bake for 50 to 60 minutes, or until crispy, being sure to stir every 20 minutes or so to prevent burning.
4. Place rice on the bottom of a serving dish, pour over cauliflower, garnish with cilantro, mint, pomegranate seeds and pine nuts. Serve warm or room temperature.

 
Katie FarinaComment